These instructions relate to updating the DMX card firmware for Tiger Touch and Tiger Touch Pro consoles. The update is only required on these two product types and should not be performed on any other products. The update is to resolve an issue where the DMX stops outputting randomly after around 6 hours use of the console.
Please download the update using the following link.
DMX Firmware Update V6.1.23
Once you have inserted the USB stick please follow these steps.
1) Shutdown the software from the Tools menu
2) Open Explorer from the Tools menu
3) Browse to the file UsbExpertSetupV6.2(23).msi
4) Run the setup and follow the instructions carefully.
5) Once the setup has completed it should prompt you to restart the console.
6) After the console restarts it should prompt you in Health Check to update the firmware.
7) Select Fix or open USB Expert from the Tools menu
8) Select the Tab labelled “Service”
9) Select “Auto Update”
10) The update process should happen automatically and will take about 10min..
To verify that the firmware has updated successfully you can select the Dmx Panel (int USB Expert) and in the Info tab it should display the SoftwareVersion. This should read "Nov 6 2014".
| On older desks, a modification to the disk drive may be necessary.
This involves linking two pins on the disk drive as shown below.
If this link is NOT made some functions on the DISK MENU will not
work :-
- The "Format & Save" option will not function.
However, the "Format" and the "Save" options
will still function if they are executed separately.
|
| |
|

|
|
Q. Will any computer
floppy disk drive work on my desk?
A. The answer is yes, as long as you are using the
latest software and AVOS. |
|
Q. Why does the light on the floppy drive stay on when it's not being used?
A. On the latest version of the software the modification on the floppy drive is not required. If you want the light to turn off remove the modification in the drive. |
|
|
Floppy Disk Drive (FDD)
Repair & Maintenance
A regularly maintained FDD's will rarely cause any problems.
The majority of problems that do occur on a FDD can be fixed easily.
|
| What can go wrong with a FDD?
Problem
The most common problem occurs when
the 34 way ribbon cable is removed from the FDD.
If this cable (connects the FDD to the Borris motherboard) is then plugged in
backwards on the floppy drive, the drive will NOT work and the floppy drive LED light may stay on
permanently.
Solution
Remove the cable from the back of the FDD and re-insert it
correctly.
|
|

|
|
Problem
Spindle Motor or Electrical Circuit Burn
Out - With age, the spindle motor and electrical circuits can burn out, but this doesn't happen very often. The most common cause for this is a dirty/dusty FDD.
Solution
Vacuuming in and around the FDD (when cleaning the console) will help to extend the life of
your FDD.
Problem
FDD Read/Write Errors - The read/write heads in the FDD can and do become dirty with time. Environmental conditions
will add to this problem (dusty or smoky areas!).
Solution
Regular cleaning of the read/write heads with a commercially available FDD HEAD CLEANER.
These look just like a floppy disk on the outside, but inside the case is a special pad on which you put a couple of drops of a special cleaner fluid that comes with the kit. Always use the drops, as a dry pad can scratch the heads.
Additionally, replace the cleaner-disk as recommended on the package, or when the disk pad appears dirty.
Note that a dirty cleaner-disk can also scratch the heads.
Problem
FDD Read/Write Errors - Head Alignment
With age, the read/write heads can become moved out of alignment.
At first, you will notice that you can read/write to your floppy disk, but the disk can not be read on another consoles' FDD.
Eventually, the FDD will not read/write at all.
Solution
Replace the FDD.
Although the heads can be re-aligned with special equipment, the cost would outweigh the price of a inexpensive new FDD.
|
|
1212 HR II Graphics
Tablet.
|
|
|
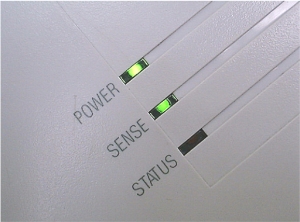
On the 1212 HR II Graphic Tablet are three status
LED's - these
indicate the condition of the Tablet.
Power LED is lit when power is ON
Sense LED is lit when the stylus is in the working area and within the proximity
Status LED "Lights" when a button on the stylus is pressed |
|
|
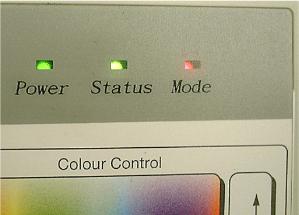
1212 HR III Graphics
Tablet.
|
|
|
On the 1212 HR III Graphic Tablet are three status
LED's - these
indicate the condition of the Tablet.
Power LED flashes when the tablet has power but the pen is not
within the working area.
Status LED is lit when the stylus is in the working area and within the proximity
Mode LED "Lights" when a button on the stylus is pressed |
|
| |
Troubleshooting
|
Before you confirm your tablet does not function properly and decide to send it back to AVOLITES for repair, please go through the following steps: |
- If the Power LED flashes when the stylus is in the working area, then it's very possible that the graphic tablet does not work properly
|
- When the Power LED is on and the LED does not flash when the stylus is on the working area, then check and make sure all the connections are secure. If the breakdown is due to disconnection, switch off the desk and connect all the cables firmly and then restart the desk and the graphics tablet.
|
- If for any reason the stylus has been unplugged while the graphics tablet is on, we strongly suggest that you press the key "RESET" in order to make it function properly.
|
|
Care & Cleaning
|
| |
As with all electrical equipment, it is necessary to exercise care while handling and cleaning the graphic tablet.
Please note the following :- |
- Avoid dropping or knocking the tablet or stylus.
|
- To clean the tablet and its accessories, make sure the desk and graphics tablet is switched off.
|
- Use a soft cloth lightly damped with water or a non-abrasive cleaner which does not harm plastic components.
|
- Do not use chemicals or abrasive materials which may damage the surface.
|
- Never immerse any part of the tablet or stylus in any liquid, as this will damage the circuitry inside.
|
|
|
The QWERTY DIN socket is for connecting a standard PC keyboard.
This is used for entering legends to name memories, chases and palettes.
|
|
|
Before you confirm that your
keyboard does not function properly, please note that you should
always connect the keyboard to the desk before powering up the
desk.
Note that for newer style keyboards, a
PS/2 Style Keyboard Adaptor Cable is required - contact Avolites for
further details.
|
FAQ 10003
How
do I link out the Grand Master Fader on a Pearl?
|
|
Occasionally, the Grand
Master Fader on a Pearl can get damaged.
This can be caused by the flight case lid accidentally knocking the
fader when the lid is put on or removed.
To do this, you must first
determine which type of Fader Board you have.
There are two types :- MF4750A and MF4750B and this is
indicated on the fader pcb.
MF4750A Type pcb
- Ensure that the Grand Master
Fader is set to Full
- Open the Pearl Front Panel
- Locate the diode marked D1 on
the MF4750A fader pcb.
- Solder a wire link between the
anode of D1 and the point labelled 'T' of the Grand Master Fader
- Close the Pearl Front Panel
- Check the Grand Master Fader is
still set to Full
- Turn the Program switch to
System
- Press Softkey A [Service]
- Press Softkey B [Diagnostic
Screen]
- In the top left it should read
GM=ff
- That's it ...
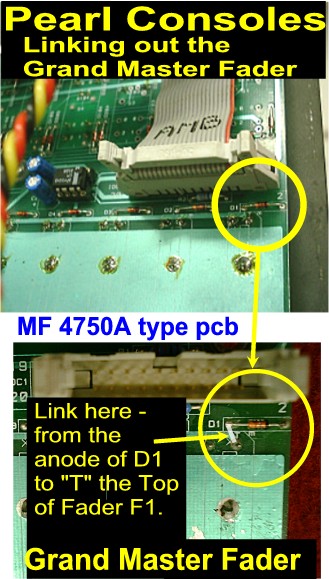
MF4750A Type pcb
- Ensure that the Grand Master
Fader is set to Full
- Open the Pearl Front Panel
- Locate the link marked GM-LINK
on the MF4750B fader pcb.
- Solder a wire link between the
two pads of this link
- Close the Pearl Front Panel
- Check the Grand Master Fader is
still set to Full
- Turn the Program switch to
System
- Press Softkey A [Service]
- Press Softkey B [Diagnostic
Screen]
- In the top left it should read
GM=ff
- That's it ...
|
| |
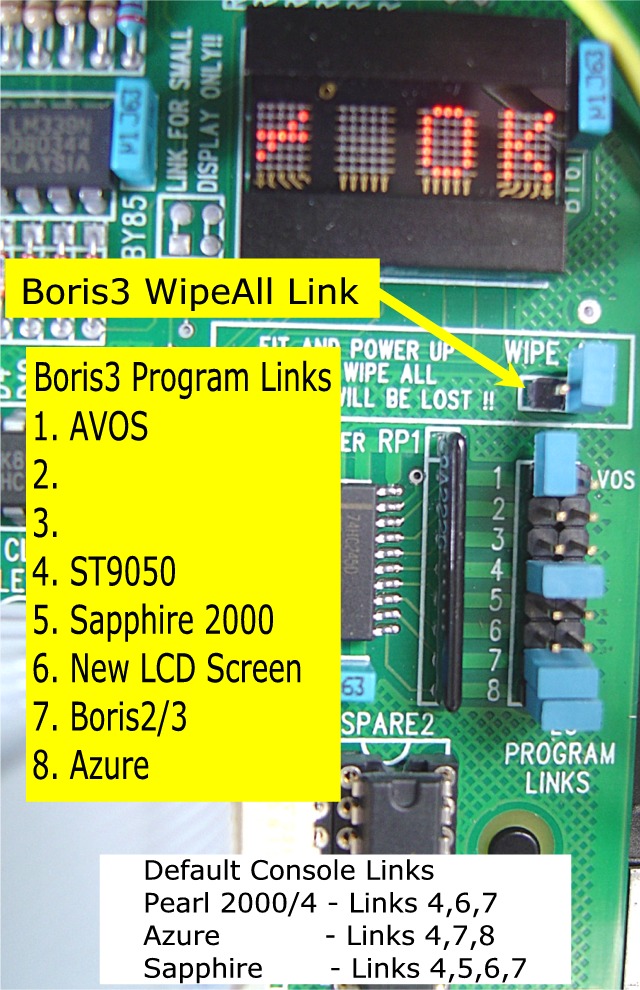
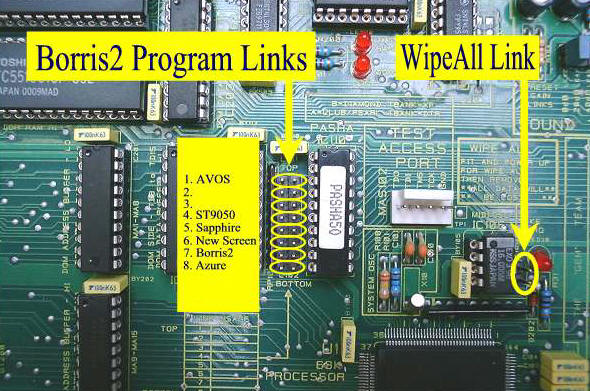
FAQ 10002
How do I set the Program links?
|
|
The tables below
show how to set the Program links on a Boris motherboard
back to the factory default setting.
|
Azure
Console
|
| Position |
Link |
| 1 |
OFF |
| 2 |
OFF |
| 3 |
OFF |
| 4 |
ON* |
| 5 |
OFF |
| 6 |
OFF |
| 7 |
ON |
| 8 |
ON |
| * Note that link 4 is
only required if the SAB 6815A
piggy-back board is fitted to the Borris 2 motherboard. |
|
Pearl
Console
|
| Position |
Link |
| 1 |
OFF |
| 2 |
OFF |
| 3 |
OFF |
| 4 |
ON* |
| 5 |
OFF |
| 6 |
OFF |
| 7 |
ON |
| 8 |
OFF |
| * Note that link 4 is
only required if the SAB 6815A
piggy-back board is fitted to the Borris 2 motherboard. |
|
Sapphire
Console
|
| Position |
Link |
| 1 |
OFF |
| 2 |
OFF |
| 3 |
OFF |
| 4 |
ON* |
| 5 |
ON |
| 6 |
ON |
| 7 |
ON |
| 8 |
OFF |
| * Note that link 4 is
only required if the SAB 6815A
piggy-back board is fitted to the Borris 2 motherboard. |
|
| |
Tiger Touch Non Pro
Select “Load Optimized Defaults” and enter
Set “Supervisor Password” to 68340
Set “User Password” to 68340
Enter the “Standard CMOS Features” Menu
Set the correct “Date and Time”
Set “Drive A” to [none]
Set “Halt on” to [All, But Keyboard]
Enter the “Advanced BIOS Features” Menu
Set the “First Boot Device” to [Hard Disk]
Set the “Second Boot Device” to [Disabled]
Set the “Third Boot Device” to [Disabled]
Set “Swap Floppy Drive” to [Disabled]
Set “Boot Up Floppy Seek” to [Disabled]
Set “Boot Up NumLock Status” to [Off]
Enter the “Advanced Chipset Settings” Menu
Set the “Onchip VGA Control” to [Auto]
Set the “LCD Type” to [7]
Enter the “Integrated Peripherals” Menu, and
then enter the “Onboard Device” Menu.
Set the “USB Keyboard Support” to [Enabled]
Enter the “Integrated Peripheral” Menu, and
then enter the “Super IO Device” Menu.
Set the “PWRON After PWR-Fail” to [Former-Sts]
Press Escape, then F10 to Save to CMOS and Y followed by Enter
Pearl Expert Non Pro
Select “Load Optimized Defaults” and enter
Set “Supervisor Password” to 68340
Set “User Password” to 68340
Enter the “Standard CMOS Features” Menu
Set the correct “Date and Time”
Set “Drive A” to [none]
Set “Halt on” to [All, But Keyboard]
Enter the “Advanced BIOS Features” Menu
Set the “First Boot Device” to [Hard Disk]
Set the “Second Boot Device” to [Disabled]
Set the “Third Boot Device” to [Disabled]
Set the “Boot Other Device” to [Disabled]
Set “Swap Floppy Drive” to [Disabled]
Set “Boot Up Floppy Seek” to [Disabled]
Set “Boot Up NumLock Status” to [Off]
Enter the “Advanced Chipset Settings” Menu
Set the “Onchip VGA Control” to [Auto]
Set the “Boot Display” to CRT}
Set the “LCD Type” to [7]
Enter the “Integrated Peripherals” Menu, and
then enter the “Onboard Device” Menu.
Set the “USB Keyboard Support” to [Enabled]
Enter the “Integrated Peripheral” Menu, and
then enter the “Super IO Device” Menu.
Set the “PWRON After PWR-Fail” to [Former-Sts]
Press Escape, then F10 to Save to CMOS and Y followed by Enter
BIOS settings as below (based on default loaded)
Under the Exit menu, select “Load Optimised Defaults” and press enter
Under the Security menu, set both the “Supervisor Password” and “User Password” to 68340
Enter the “Main” Menu, and set the correct “Date and Time”
in “Main”, enter “Boot features”, and set the NumLock to “Off”
In “Advanced” enter “System Agent (SA) Configuration” then select “ Graphics Configuration” and Finally select “IGD Configuration” and set as follows:
IGD – Boot Type to LVDS
IGD – Secondary Boot Type to DVI
IGD – LCD Panel Type to Reserved #13 LVDS Color Panel
Panel Color Depth to 18 Bit.
Enter the “Advanced” menu, and then enter the “South Bridge Configuration” menu.
Enter the “SB PCI Express Config” menu.
Enter the “PCI Express Port 1” menu, and change the “ASPM” setting to “Disabled”.
Go back to the “SB PCI Express Config” menu.
Enter the “PCI Express Port 2” menu, and change the “ASPM” setting to “Disabled”.
Enter the “Boot” Menu to change the hard disk Boot Priority Order as follows:
Set the [USB HDD] to 1
Set the [USB CD] to 2
Set the [ATA HDD0] to 3
Disable the other devices by selecting them and pressing Shift + 1
Enter the “Others” Menu, and then enter the “SIO Configuration” Menu.
Set the “Powerloss / Powercontrol” setting to [Always Off]
Go to the Exit menu. Select “Exit Saving Changes”, press Enter, then Y, then Enter.
Tiger Touch Pro
BIOS settings as below (based on default loaded)
Under the Exit menu, select “Load Optimized Defaults” and press enter
Under the Security menu, set both the “Supervisor Password” and “User Password” to 68340
Enter the “Main” Menu, and set the correct “Date and Time”
in “Main”, enter “Boot features”, and set the NumLock to “Off”
In “Advanced” enter “System Agent (SA) Configuration” then select “ Graphics Configuration” and Finally select “IGD Configuration” and set as follows:
IGD – Boot Type to LVDS
IGD – Secondary Boot Type to CRT
IGD – LCD Panel Type to 1280 x 800 LVDS Color Panel
Panel Color Depth to 18 Bit.
Enter the “Advanced” menu, and then enter the “South Bridge Configuration” menu.
Enter the “SB PCI Express Config” menu.
Enter the “PCI Express Port 1” menu, and change the “ASPM” setting to “Disabled”.
Go back to the “SB PCI Express Config” menu.
Enter the “PCI Express Port 2” menu, and change the “ASPM” setting to “Disabled”.
Enter the “Boot” Menu to change the hard disk Boot Priority Order as follows:
Set the [USB HDD] to 1
Set the [USB CD] to 2
Set the [ATA HDD0] to 3
Disable the other devices by selecting them and pressing Shift + 1
Enter the “Others” Menu, and then enter the “SIO Configuration” Menu.
Set the “Powerloss / Powercontrol” setting to [Always Off]
Go to the Exit menu. Select “Exit Saving Changes”, press Enter, then Y, then Enter.
Tiger Touch II
BIOS settings as below (based on default loaded)
Under the Exit menu, select “Load Optimized Defaults” and press enter
Under the Security menu, set both the “Supervisor Password” and “User Password” to 68340
Enter the “Main” Menu, and set the correct “Date and Time”
in “Main”, enter “Boot features”, and set the NumLock to “Off”
In “Advanced” enter “System Agent (SA) Configuration” then select “ Graphics Configuration” and Finally select “IGD Configuration” and set as follows:
IGD – Boot Type to LVDS
IGD – Secondary Boot Type to CRT
IGD – LCD Panel Type to 1366 x 768 LVDS Co
Panel Color Depth to 24 Bit.
Enter the “Advanced” menu, and then enter the “South Bridge Configuration” menu.
Enter the “SB PCI Express Config” menu.
Enter the “PCI Express Port 1” menu, and change the “ASPM” setting to “Disabled”.
Go back to the “SB PCI Express Config” menu.
Enter the “PCI Express Port 2” menu, and change the “ASPM” setting to “Disabled”.
Enter the “Boot” Menu to change the hard disk Boot Priority Order as follows:
Set the [USB HDD] to 1
Set the [USB CD] to 2
Set the [ATA HDD0] to 3
Disable the other devices by selecting them and pressing Shift + 1
Enter the “Others” Menu, and then enter the “SIO Configuration” Menu.
Set the “Powerloss / Powercontrol” setting to [Always Off]
Go to the Exit menu. Select “Exit Saving Changes”, press Enter, then Y, then Enter.
Pearl Expert Pro
BIOS settings as below (based on default loaded)
- Under the Exit menu, select “Load Optimized Defaults” and press enter
Under the Security menu, set both the “Supervisor Password” and “User Password” to 68340
Enter the “Main” Menu, and set the correct “Date and Time”
in “Main”, enter “Boot features”, and set the NumLock to “Off”
- In “Advanced” enter “System Agent (SA) Configuration” then select “ Graphics Configuration” and Finally select “IGD Configuration” and set as follows:
IGD – Boot Type to LVDS
IGD – Secondary Boot Type to CRT
IGD – LCD Panel Type to 1280 x 800 LVDS Color Panel
Panel Color Depth to 18 Bit.
- Enter the “Advanced” menu, and then enter the “South Bridge Configuration” menu.
- Enter the “SB PCI Express Config” menu.
- Enter the “PCI Express Port 1” menu, and change the “ASPM” setting to “Disabled”.
- Go back to the “SB PCI Express Config” menu.
- Enter the “PCI Express Port 2” menu, and change the “ASPM” setting to “Disabled”.
- Enter the “Boot” Menu to change the hard disk Boot Priority Order as follows:
Set the [USB HDD] to 1
Set the [USB CD] to 2
Set the [ATA HDD0] to 3
- Disable the other devices by selecting them and pressing Shift + 1
- Enter the “Others” Menu, and then enter the “SIO Configuration” Menu.
Set the “Powerloss / Powercontrol” setting to [Always Off]
- Go to the Exit menu. Select “Exit Saving Changes”, press Enter, then Y, then Enter.
Sapphire Touch
BIOS settings as below(based on default loaded)
Under the Exit menu, select “Load Optimized Defaults” and press enter
Under the Security menu, set both the “Supervisor Password” and “User Password” to 68340
Enter the “Main” Menu, and set the correct “Date and Time”
Enter the “Boot” Menu to change the hard disk Boot Priority Order as follows:
Set the [USB HDD] to 1
Set the [USB CD] to 2
Set the [ATA HDD3] to 3
Disable the other devices by selecting them and pressing Shift + 1
Under Main Menu / Boot Features, set “NumLock Status” to [Off]
Enter the “Others” Menu, and then enter the “SIO Configuration” Menu.
Set the “Powerloss / Powercontrol” setting to [Always Off]
Enter the “Advanced” menu, and then enter the “South Bridge Configuration” menu.
Enter the “SB PCI Express Config” menu.
Enter the “PCI Express Port 1” menu, and change the “ASPM” setting to “Disabled”.
Go back to the “SB PCI Express Config” menu.
Enter the “PCI Express Port 2” menu, and change the “ASPM” setting to “Disabled”.
Go to the Exit menu. Select “Exit Saving Changes”, press Enter, then Y, then Enter.
BIOS settings as below (based on default loaded)
Under the “Save & Exit” menu, select “Restore Defaults” and press enter
Enter the “Main” Menu, and set the correct “System Date and System Time”
In “Advanced” enter “USB Configuration” then select “xHCI Mode” and set it as “Disabled”
In “Advanced” enter “LVDS Configuration” then select “LVDS support” and set it as “Enabled” then set as
follows:
Non–EDID Support Enabled LVDS Panel Config Select LVDS adjusted Parameters LVDS Mode LDI 8-
Bit
LVDS Brightness 255
Under the “Security” menu, set “Administrator Password” to 68340
In “Power” menu set as follows:
Power Failure Recovery Disabled
Never Off Disabled (default)
Hibernate like Soft Off Disabled
USB at Power-Off Always Off (default)
In “Wake Up Resources” set “LAN” as “Disabled”
Enter the “Boot” Menu
Set “Bootup NumLock State” to “Off”
Set “Prefer USB Boot” to “Enabled”
Change the hard disk Boot Option Priority as follows: Boot Option #1 to or
Boot Option #2 to [Diagnostic Program]
Disable the other devices
Go to the “Save & Exit” menu. Select “Save Changes and Exit”, press Enter.
Under the “Save & Exit” menu, select “Restore Defaults” and press enter
Under the “Main” menu
Select System Information and check:
- BIOS Revision: R1.26.0.SR.2
- Build Date and Time: 09/08/2015 12:03:30
Set the correct “System Date and System Time”
Under “Advanced” menu
Enter “USB Configuration” then select “xHCI Mode” and set it as “Disabled”
Under “Advanced”
Enter “LVDS Configuration” then select “LVDS support” and set it as “Enabled” then set as follows:
Non–EDID Support Enabled LVDS Panel Config Select 1280 x 800 LVDS Mode LDI 6-Bit
LVDS Brightness 255
Under the “Security” menu
Set “Administrator Password” to 68340
Under “Power” menu set as follows:
Power Failure Recovery Disabled
Never Off Disabled (default)
Hibernate like Soft Off Disabled
USB at Power-Off Always Off (default)
In “Wake Up Resources” set “LAN” as “Disabled”
Under “Boot” Menu
Set “Bootup NumLock State” to “Off”
Change the hard disk Boot Option Priority as follows: Boot Option #1 to or
Boot Option #2 to [Diagnostic Program]
Disable the other devices
Go to the “Save & Exit” menu
Select “Save Changes and Exit”, press Enter
BIOS settings as below (based on default loaded)
Under the “Save & Exit” menu, select “Restore Defaults” and press enter
Enter the “Main” Menu, and set the correct “System Date and System Time”
In “Advanced” enter “USB Configuration” then select “xHCI Mode” and set it as “Disabled”
In “Advanced” enter “LVDS Configuration” then select “LVDS support” and set it as “Enabled” then set as
follows:
Non–EDID Support Enabled LVDS Panel Config Select 1366 x 768 LVDS Mode FPDI 8-Bit (default)
LVDS Brightness 255
Under the “Security” menu, set “Administrator Password” to 68340
In “Power” menu set as follows:
Power Failure Recovery Disabled
Never Off Disabled (default)
Hibernate like Soft Off Disabled
USB at Power-Off Always Off (default)
In “Wake Up Resources” set “LAN” as “Disabled”
Enter the “Boot” Menu
Set “Bootup NumLock State” to “Off”
Change the hard disk Boot Option Priority as follows: Boot Option #1 to or
Boot Option #2 to [Diagnostic Program]
Disable the other devices
Go to the “Save & Exit” menu. Select “Save Changes and Exit”, press Enter
BIOS settings as below (based on default loaded)
Under the “Save & Exit” menu, select “Restore Defaults” and press enter
Enter the “Main” Menu, and set the correct “System Date and System Time”
In “Advanced” enter “USB Configuration” then select “xHCI Mode” and set it as “Disabled”
In “Advanced” enter “LVDS Configuration” then select “LVDS support” and set it as “Enabled” then set as
follows:
Non–EDID Support Enabled LVDS Panel Config Select 1366 x 768 LVDS Mode FPDI 8-Bit (default)
LVDS Brightness 255
Under the “Security” menu, set “Administrator Password” to 68340
In “Power” menu set as follows:
Power Failure Recovery Disabled
Never Off Disabled (default)
Hibernate like Soft Off Disabled
USB at Power-Off Always Off (default)
In “Wake Up Resources” set “LAN” as “Disabled”
Enter the “Boot” Menu
Set “Bootup NumLock State” to “Off”
Change the hard disk Boot Option Priority as follows: Boot Option #1 to or
Boot Option #2 to [Diagnostic Program]
Disable the other devices
Go to the “Save & Exit” menu. Select “Save Changes and Exit”, press Enter.
BIOS settings as below (based on default loaded)
Under the “Save & Exit” menu, select “Restore Defaults” and press enter
Enter the “Main” Menu, and set the correct “System Date and System Time”
In “Advanced” enter “USB Configuration” then select “xHCI Mode” and set it as “Disabled”
Under the “Security” menu, set “Administrator Password” to 68340
In “Power” menu set as follows:
Power Failure Recovery Disabled
Never Off Disabled (default)
Hibernate like Soft Off Disabled
USB at Power-Off Always Off (default)
In “Wake Up Resources” set “LAN” as “Disabled”
Enter the “Boot” Menu
Set “Bootup NumLock State” to “Off”
Change the hard disk Boot Option Priority as follows: Boot Option #1 to or
Boot Option #2 to [Diagnostic Program]
Disable the other devices
Go to the “Save & Exit” menu. Select “Save Changes and Exit”, press Enter.
BIOS settings as below (based on default loaded)
Under the “Save & Exit” menu, select “Restore Defaults” and press enter
Under the “Main” menu Select System Information and check:
BIOS Revision: R1.3.0 or Above
Build Date and Time: 10/12/2018 10:56:25
Set the correct “System Date and System Time”
Under “Advanced” menu Enter “CPU Configuration” then select “C States” and set it as “Disabled” (default)
NOTE: Usually the C States is set as Disabled by default but it needs to be checked
Under “Advanced” Enter “LVDS Configuration” then select “LVDS support” and set it as “Enabled”
then set as follows:
Non–EDID Support Enabled
LVDS Panel Config Select LVDS adjusted Parameters
LVDS Mode LDI 8-Bit
LVDS Brightness 14
Under the “Security” menu Set “Supervisor Password” to 68340
Under “Power” menu set as follows:
Power Failure Recovery Disabled
Never Off Disabled (default)
USB/PS2 Power Always Off (default)
Under “Boot” menu Set “Bootup NumLock State” to “Off”
Go to the “Save & Exit” menu Select “Save Changes and Reset”, press Enter
Under the “Save & Exit” menu, select “Restore Defaults” and press enter
Under the “Main” menu Select System Information and check:
BIOS Revision: R1.3.0 or Above
- Build Date and Time: 10/12/2018 10:56:25
Set the correct “System Date and System Time”
Under “Advanced” menu Enter “CPU Configuration” then select “C States” and set it as “Disabled” (default)
NOTE: Usually the C States is set as Disabled by default but it needs to be checked
Under “Advanced” Enter “LVDS Configuration” then select “LVDS support” and set it as “Enabled”
then set as follows:
Non–EDID Support Enabled
LVDS Panel Config Select 1280 x 800
LVDS Mode LDI 6-Bit
LVDS Brightness 8
Under the “Security” menu Set “Supervisor Password” to 68340
Under “Power” menu set as follows:
Power Failure Recovery Disabled
Never Off Disabled (default)
USB/PS2 Power Always Off (default)
Under “Boot” menu Set “Bootup NumLock State” to “Off”
Go to the “Save & Exit” menu Select “Save Changes and Reset”, press Enter
BIOS settings as below (based on default loaded)
Under the “Save & Exit” menu, select “Restore Defaults” and press enter
Under the “Main” menu Select System Information and check:
- BIOS Revision: R1.3.0 or Above
- Build Date and Time: 10/12/2018 10:56:25
Set the correct “System Date and System Time”
Under “Advanced” menu Enter “CPU Configuration” then select “C States” and set it as “Disabled” (default)
NOTE: Usually the C States is set as Disabled by default but it needs to be checked
Under “Advanced” Enter “LVDS Configuration” then select “LVDS support” and set it as “Enabled”
then set as follows:
Non–EDID Support Enabled
LVDS Panel Config Select 1366 x 768
LVDS Mode FPDI 8-Bit (default)
LVDS Brightness 8
Under the “Security” menu Set “Supervisor Password” to 68340
Under “Power” menu set as follows:
Power Failure Recovery Disabled
Never Off Disabled (default)
USB/PS2 Power Always Off (default)
Under “Boot” menu Set “Bootup NumLock State” to “Off”
Go to the “Save & Exit” menu Select “Save Changes and Reset”, press Enter
BIOS settings as below (based on default loaded)Under the “Save & Exit” menu, select “Restore Defaults” and press enter
Under the “Main” menu Select System Information and check:
- BIOS Revision: R1.3.0 or Above- Build Date and Time: 10/12/2018 10:56:25
Set the correct “System Date and System Time”
Under “Advanced” menu Enter “CPU Configuration” then select “C States” and set it as “Disabled” (default)
NOTE: Usually the C States is set as Disabled by default but it needs to be checked
Under “Advanced” Enter “LVDS Configuration” then select “LVDS support” and set it as “Enabled”
then set as follows:
Non–EDID Support Enabled
LVDS Panel Config Select 1366 x 768
LVDS Mode FPDI 8-Bit (default)
LVDS Brightness 8
Under the “Security” menu Set “Supervisor Password” to 68340
Under “Power” menu set as follows:
Power Failure Recovery DisabledNever Off Disabled (default)
USB/PS2 Power Always Off (default)
Under “Boot” menu Set “Bootup NumLock State” to “Off”
Go to the “Save & Exit” menu Select “Save Changes and Reset”, press Enter
BIOS settings as below (based on default loaded)
Under the “Save & Exit” menu, select “Restore Defaults” and press enter
Under the “Main” menu Select System Information and check:
- BIOS Revision: R1.3.0 or Above
- Build Date and Time: 10/12/2018 10:56:25
Set the correct “System Date and System Time”
Under “Advanced” menu Enter “CPU Configuration” then select “C States” and set it as “Disabled” (default)
NOTE: Usually the C States is set as Disabled by default but it needs to be checked
Under the “Security” menu Set “Supervisor Password” to 68340
Under “Power” menu set as follows:
Power Failure Recovery Disabled
Never Off Disabled (default)
USB/PS2 Power Always Off (default)
Under “Boot” menu Set “Bootup NumLock State” to “Off”
Go to the “Save & Exit” menu Select “Save Changes and Reset”, press Enter
The following consoles will contain an additional pair of DMX driver chips that are located on the ST-DMX Board (below the MIDI-IN port):
Tiger Touch II, Arena, Sapphire Touch and Titan Net Processor 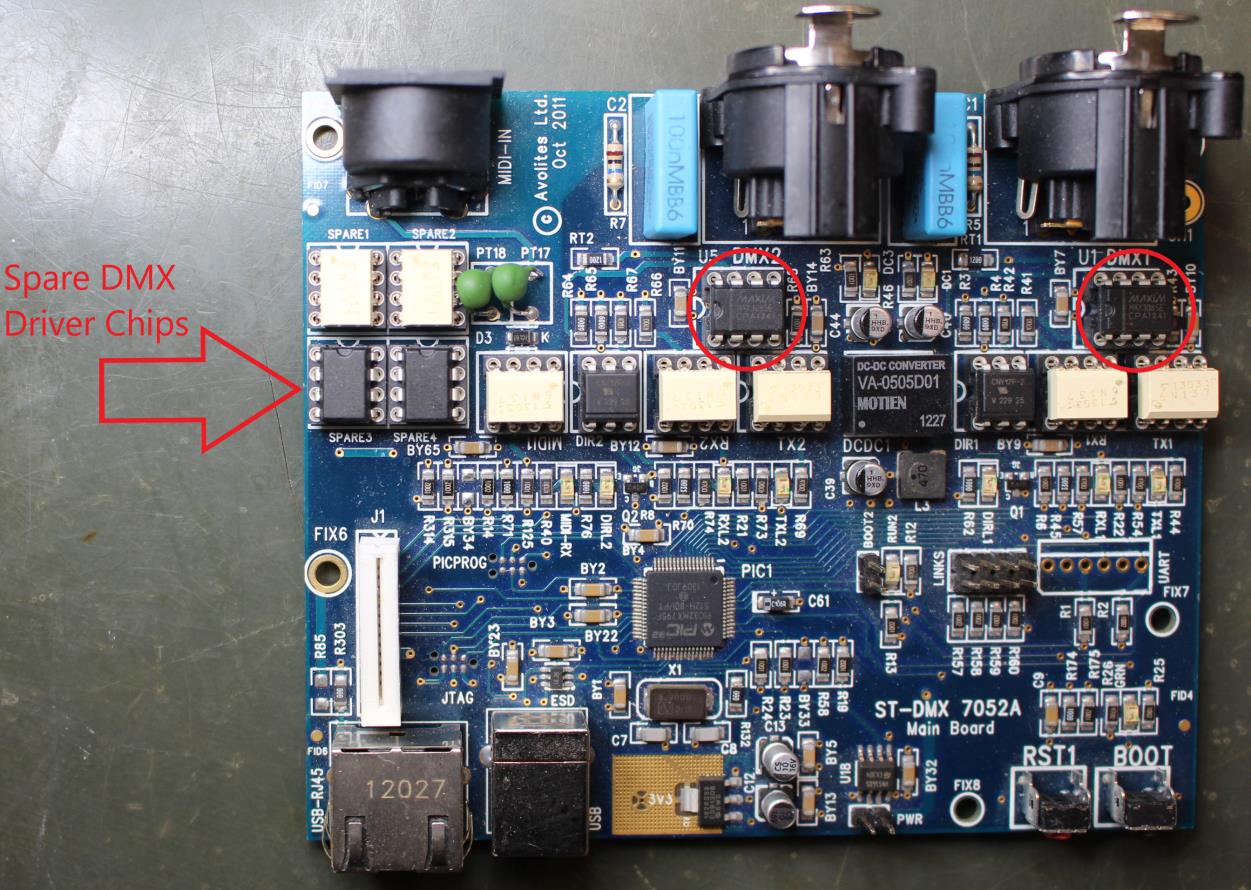
When replacing the driver chip, you will need to make sure the chip is inserted correctly.
Please note: a DMX driver chip is also included in the spare parts kit for the following consoles:
Quartz, Tiger Touch II and Arena
I
If you require additional driver chips, they can be ordered via your local Avolites Distributor.
Titan Mobile, Quartz, Tiger Touch II, Arena, Sapphire Touch
Part Number #05-03-0970
Tiger Touch/Pro, Pearl Expert/Pro
Part Number #05-03-0433
If you are experiencing unusual touch screen behaviour (e.g. mouse going haywire), then the screen will need to be cleaned thoroughly. This includes the corner edges of the screen.
To clean the corner edges of the screen, you will need to use either a brush or a business card. Once you have cleaned the screen, apply a touch screen and sensitivity calibration.
Titan Version 12 requires .NET 4.7.2 to run. If you have received the “.NET Compatibility” error during install this probably means your windows version is out of date. You might need to perform windows updates on windows 10 to get to one of these versions.
Supported versions are:
Windows 10 Anniversary Update and later (version 1607 and later) (x86 and x64)
Windows 8.1 (x86 and x64)
Windows 7 Service Pack 1 (x86 and x64)
Please note that using upgrade installers for older versions of Titan after running the V12 recovery is not currently supported and will prevent the console from starting if attempted. If you need to downgrade to a previous version it is important that this is done via a relevant recovery stick only. Consoles not starting following an attempt to use an earlier upgrade installer can be fixed by running a recovery stick and selecting Full Erase option (if recovering to a version prior to V12, you can reuse the license which was emailed to you previously).
When downgrading from V12 to previous versions of Titan it is also important that the Sapphire DMX panel firmware is downgraded in any consoles with ST-DMX cards (Sapphire Touch, TitanNet Processor, Tiger Touch II and Arena). This is because new features in the firmware are not compatible with previous versions. To downgrade the firmware open USB Expert Console and put any Sapphire DMX Panels into Boot Mode. This is found in the Service Tab. When the panels have re-appeared in boot mode, select Program which will open a file dialog. In the file dialog navigate to C:\Program Files (x86)\Avolites\UsbExpert\Panel Software and select the st_dmx.bin file. This will now install the previous ST-DMX firmware. Once this is complete do the same on all Sapphire DMX panels and then exit Boot mode. Now restart the console and you should now be OK to use the previous version of Titan. When you next upgrade to V12 you will need to carry out the firmware update again.
Intel has issued a driver update for their built in graphics cards that may cause issues with Titan starting up.
If you try and launch a PC suite application ( Simulator, TitanOne, TitanGo, and Mobile) and it does not complete start up and stays on the “pulsing grey Titan screen”. Also check in the Task Manager for windows if you see the “oneapp.igcc.winservice”, and or “Intel® Graphics Command Center Service” You will need to perform the following fix to
allow Titan to run again.
This driver update may come thru a windows update or by installing the Intel drivers manually. The drivers lock up ports required by Titan to run correctly.
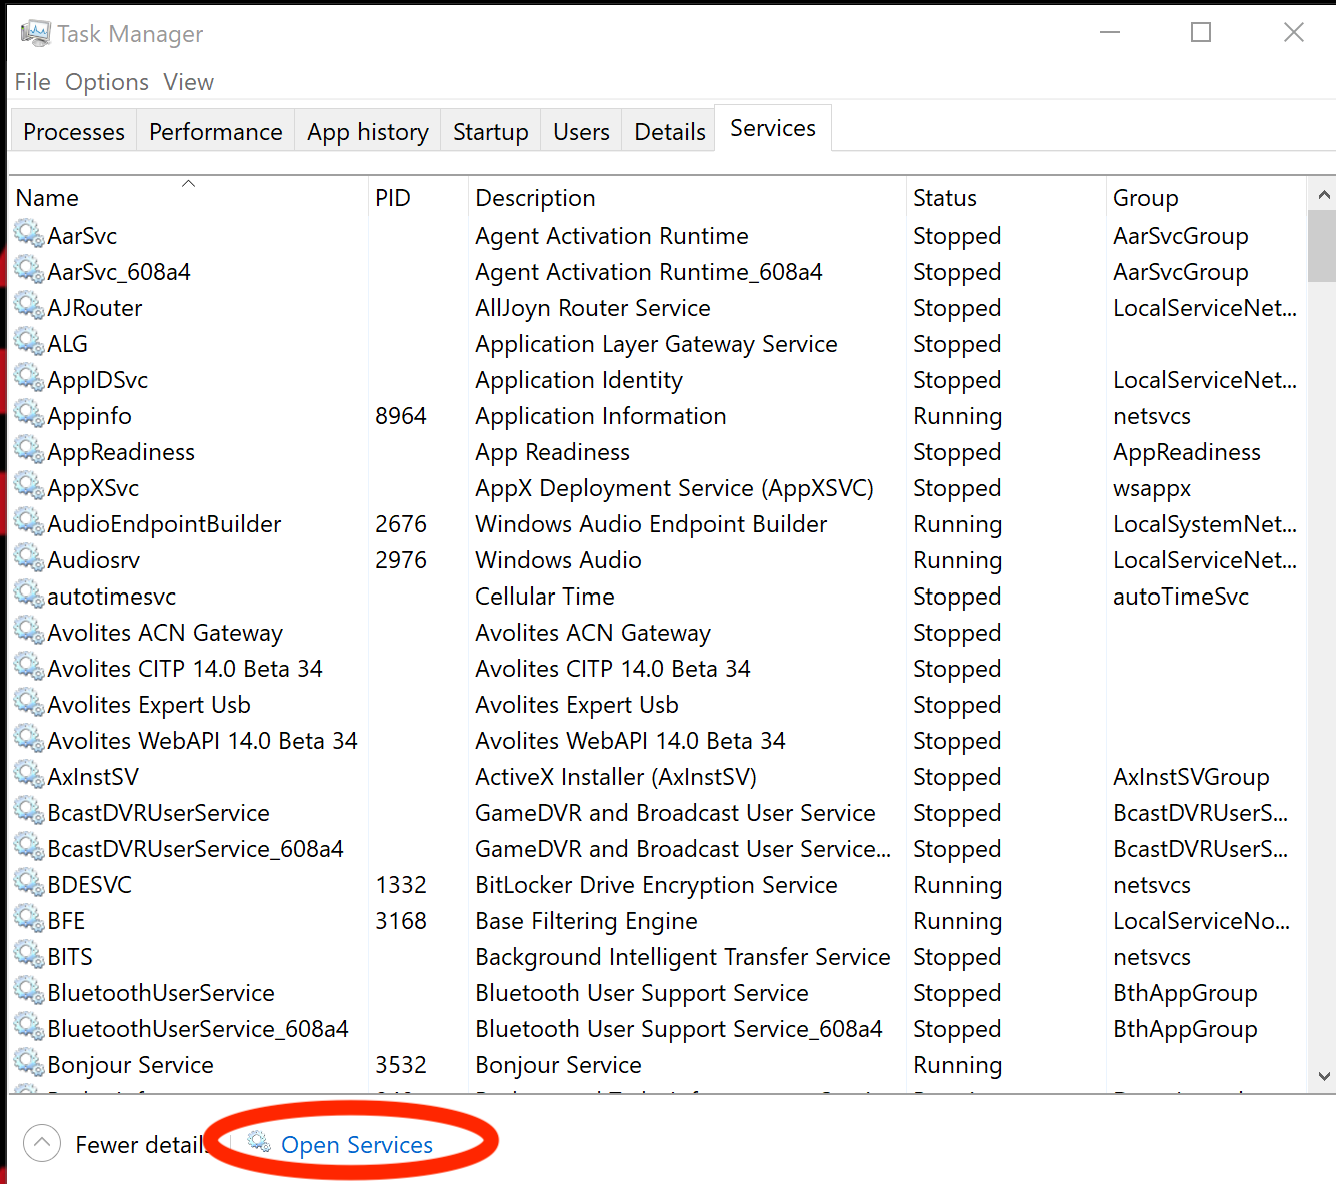
After confirming in the Task Manger of Windows (control- alt - delete on keyboard then select task manager from the pop up list) that the “oneapp.igcc.winservice”, and or “Intel® Graphics Command Center Service” are running do the following:
- In Task Manger click the Services
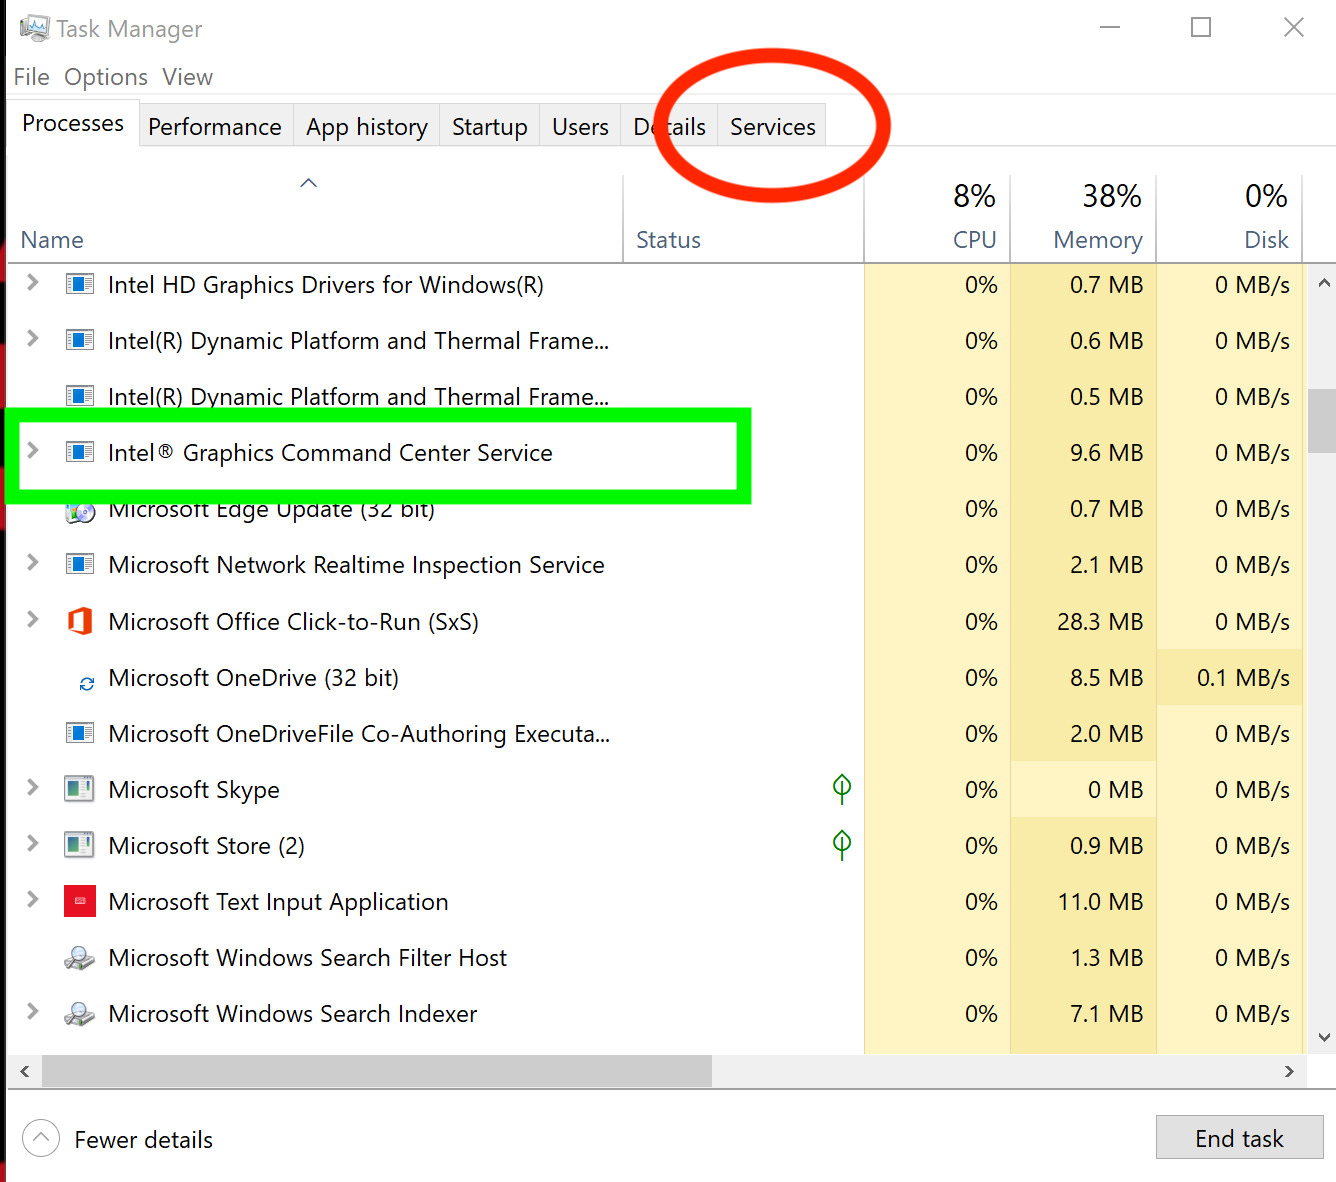
- At the bottom click the “Open Services
- In the “Services” window that opens find “Intel (R) Graphics Command Center Service”
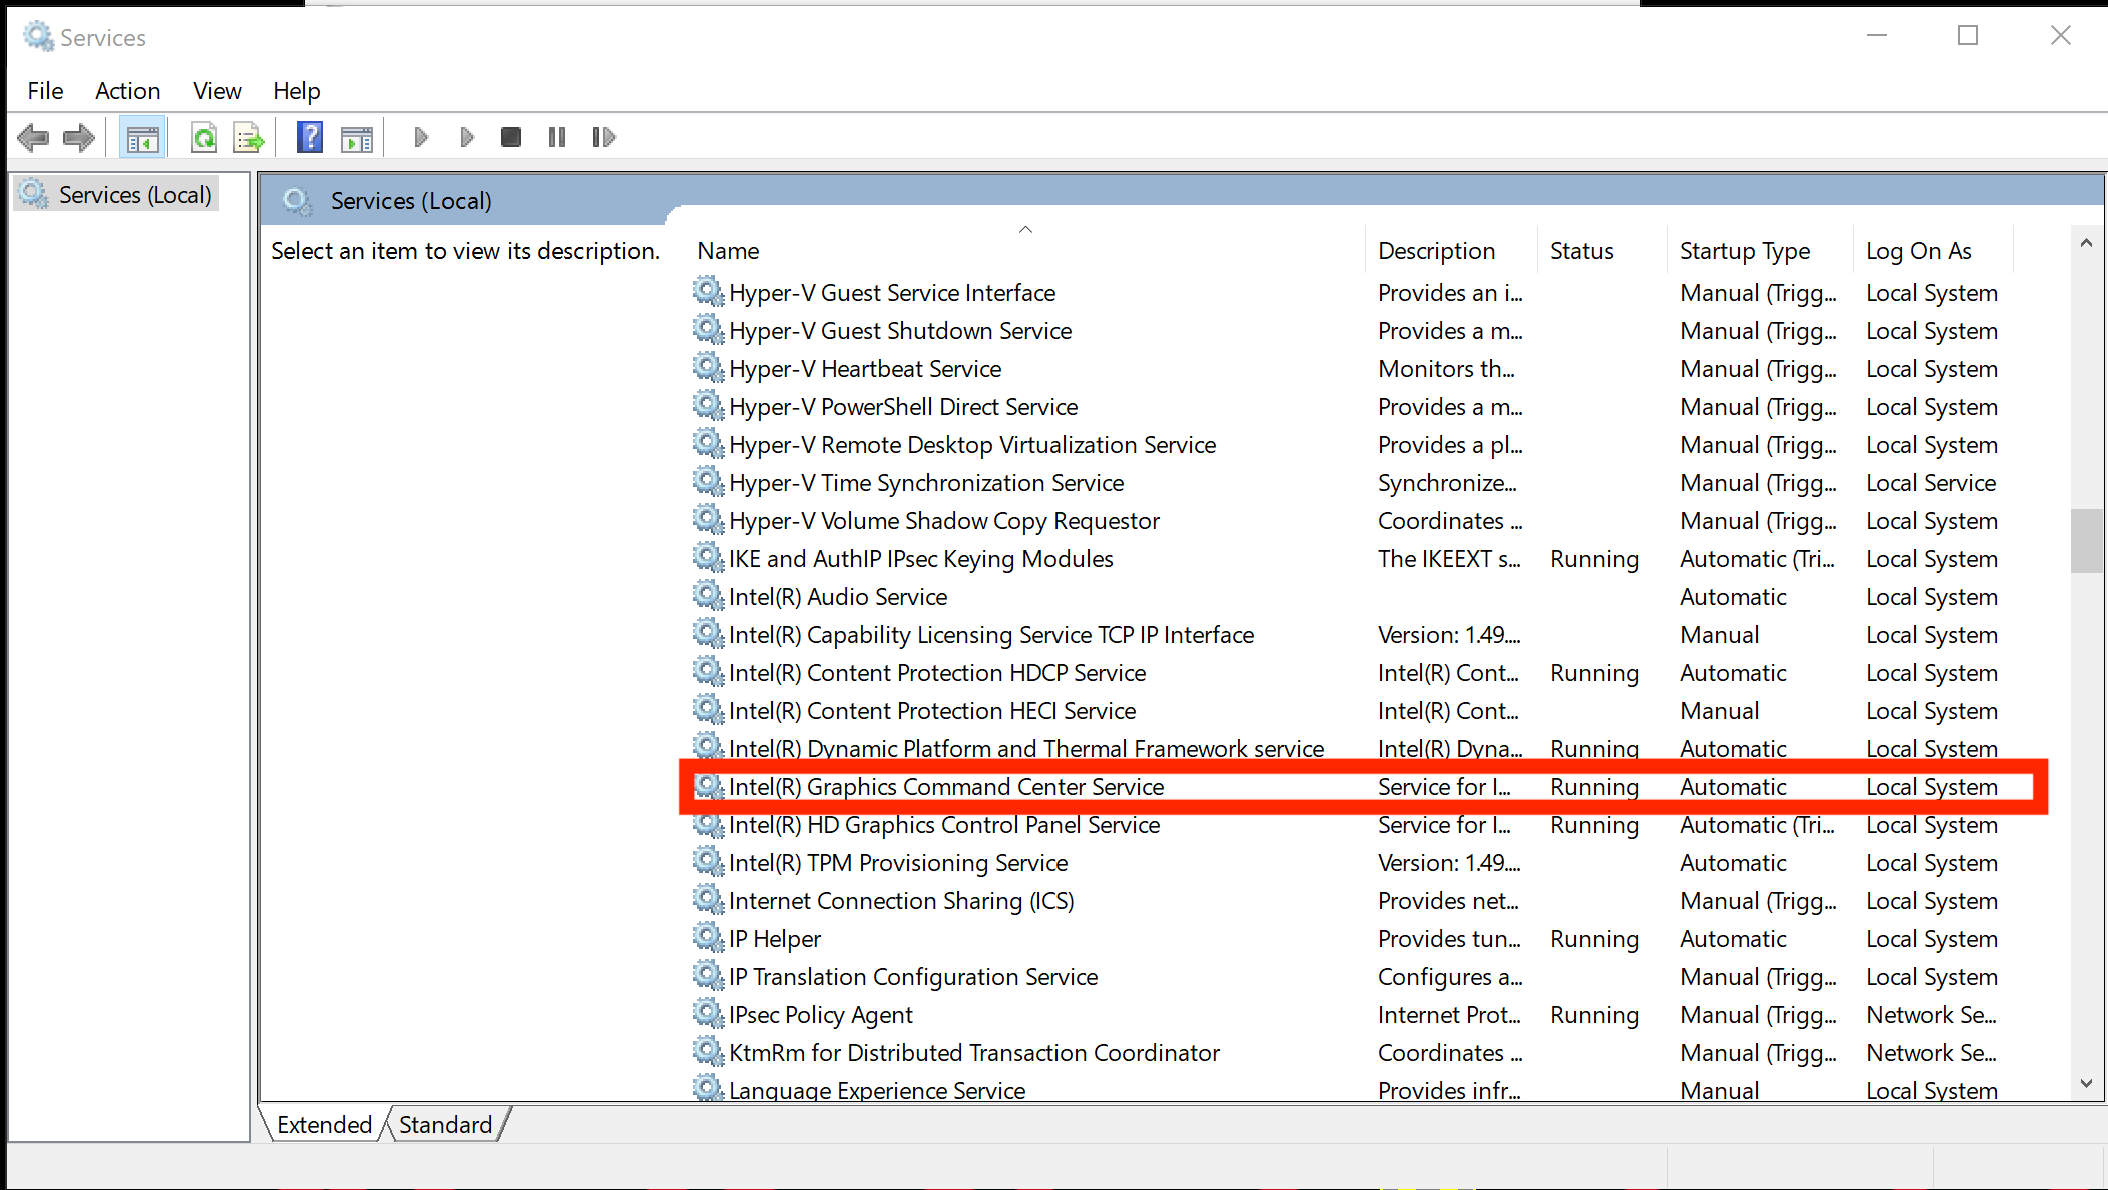
- Double click on it
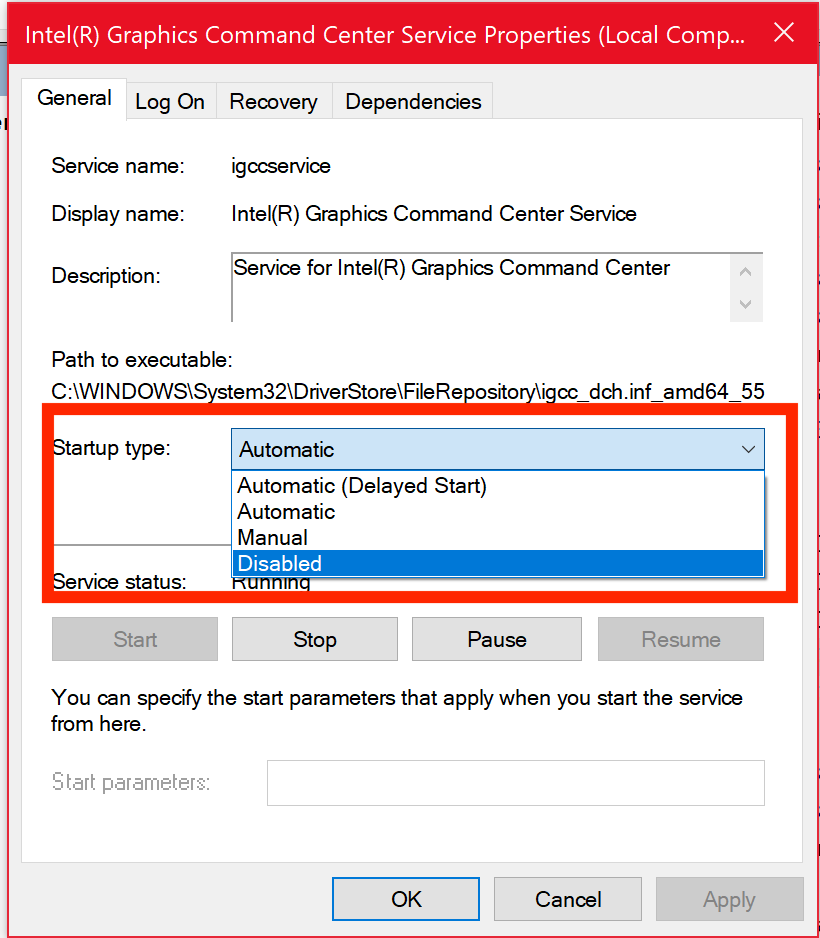
- In the Window that opens, change the “Startup type” from “Automatic” to “Disabled”
- Click Apply
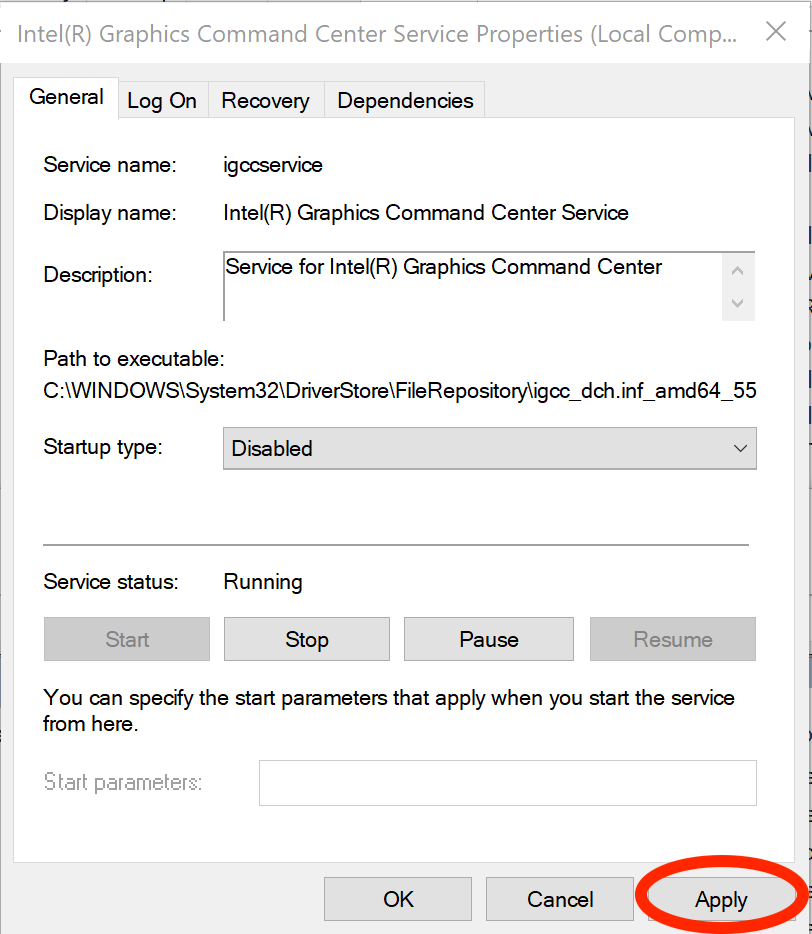
- Close the “Intel(R) Graphics Command Center Service Properties” and the “Services” windows
- Restart the computer.
Titan should now launch and run correctly.
Thru our testing disabling this service does not seem to have adverse effects. If you have graphical errors outside of Titan, you may wish to do the same steps but change from “ Disabled” to “Automatic” and restart the computer again , then perform
the fix again next time you need Titan.
A video of this has also been created here:
https://youtu.be/wfJUFc2rCCE
Alternative steps provided by Intel (Not Recommended):
Uninstall all the drivers, as they are only generic and might not be compatible with the laptop.
Our Intel drivers are only generic, we provide our drivers to the laptop manufacturers and they modify them in order to work with their laptops.
The laptop manufacturers integrated the graphic processor and soldered it down to their motherboard, the laptop manufacturer assures the compatibility and the drivers.
We strongly suggest to install only the drivers from the laptop manufacturer
installing incompatible drivers can create some registry issues. the following troubleshooting steps should be applied:
Check that the OS isupdate to the latest version
1. Download the latest graphic driver from the laptop manufacturer website for that specific model of laptop and save it on the computer.
2. Disconnect from the Internet so no new drivers are automatically installed by Windows Update.
3. Uninstall the graphic driver and all the other legacy drivers from Control Panel > Programs and Features.
4. Restart the computer.
5. Confirm in Device Manager > Video Adapters the controller is listed as 'Microsoft Basic Display Adapter' > if not, repeat steps 2 through 4.
6. If the adapter continues to be listed as ‘Intel HD Graphics’ or similar, and no other Intel Graphics driver is listed under 'Programs and Features' for removal, then it means Windows has switched to a previously installed Legacy driver. At this
point we can remove Legacy drivers from Device Manager:
6.1.1 Right-click on 'Intel HD Graphics' or similar, and select 'Uninstall Device'
6.1.2 In the pop-up window make sure 'Delete the driver software for this device' is checked.
6.1.3 Click on 'Uninstall'.
6.1.4 Restart. (Repeat steps 6.1.1 through 6.1.4 until the device gets listed as 'Microsoft Basic Display Adapter')
7. Install the graphic driver that was downloaded on step 1.
8. Restart the computer.
9. Reconnect to the Internet.
10. Download the Intel Graphics Command Centre from the Microsoft Store. ‘
For optimal performance, we recommend using a dedicated Windows PC that is not connected to the internet and has anti-virus/firewall services disabled, including Windows Defender. This is to prevent back-end communication issues required by the software and its services.
Alienware Command Center (AWCC) can prevent Titan from running correctly, this may affect users of Dell Alienware machines. Troubleshooting steps for this are currently unavailable and we would advise using an alternative machine.
Tested on Windows 10. Please ensure that all applicable updates have been installed. Windows XP, Windows Vista, Windows 7, Windows 8, Windows 8.1, Bootcamp and virtual machines, e.g. VMware, Parallels are not supported.
In some cases, Titan may launch and present a continuous grey pulsing screen which is related to any one of the following:
Titan.exe application does not launch when starting Simulator, Titan One, Titan Go or Mobile. Two icons must be present on the taskbar. If this is not the case, then you will need to check the following:
Anti-virus and Firewall software (including Windows Defender) may block Titan from working properly on your machine. You will need to check the Titan.exe application exists in the following directory: C:\Program Files (x86)\Avolites\Titan (both Titan.exe and Titan.exe.config must be present).
You will also need to check none of the Avolites applications and services are being blocked by a Firewall.
If the above does not resolve the issue, then it is highly likely another application is using the ports Titan require. If your machine has Intel Graphics Command Center installed, then you will need to apply the following: https://www.avolites.com/support/titan-troubleshooting#2628295-intel-oneappigccwinservice-prevents-titan-from-starting
· V12.0 and above: AvoKey license has not been applied correctly. Please ensure you are importing the correct token file. If the incorrect token file has been imported the engine will start, however, the screen will continue to pulse grey.
V12.0 and above requires a new license request to be submitted via www.avolites.com/licensing. The following video will guide you through the process: https://www.youtube.com/watch?v=86PcC0OzL7E&t=33s
· V12.0 and above: Hardware and application mismatch (e.g. Using Editor Key to launch Mobile Application).
Additional Infomation:
Editor Keys will only Launch the Simulator or GO application (can be used with T1-00001 to T1-019999).
AvoKeys hardware locked to the Mobile will only launch the Simulator or Mobile application.
Need help? please visit https://www.avolites.com/software/help-desk and submit a ticket.
If you are having trouble connecting via WebAPI and you have tried all the normal network configuration steps please follow these steps to ascertain if there is an issue starting the USB Expert Service.
- on the console you are trying to connect to go to Tools | Control Panel | More and then select Administrator | Services.
- find the correct version of WebAPI in the services list, if the service is listed as not started click start.
- you should find the service starts and is listed as running, if it wont start then try the following steps to fix the issue.
FIX:
- open Explorer from the Tools menu and navigate to "c:\Windows\SysWOW64\config\systemprofile\AppData\Local\Avolites\WebApiService", please note you may need to show hidden files from Folder Options to see this file.
- delete all folders that contain WebAPI
- now try to restart the service either from the Service manager or by clicking "Restart Software" from tools menu.
Sometimes, when troubleshooting complex issues with the Titan software and Avolites hardware, it's necessary for us to get some additional information to troubleshoot the issue further and prevent it from happening again in the future.
To help us get to the root cause of the issue, please send a copy of your Avolites Logs. To generate these logs, please follow the steps listed below:
PC Suite
1. Open “Log Collector” by clicking the “Start” button then “Avolites”
2. Click the “Go” button and choose the desired save location (e.g. Desktop)
3. Click the “Ok” Button
You're done! Please attach the compressed file to your email or case with us so that we can assist further. If the file size exceeds 20MB, please use a file transfer service of your choice and attach the link to your email or case.
Consoles
For this task you will need a USB drive.
1. Open “Log Collector” by clicking the “Tools” button then “Additional Programs”
2. Click the “Go” button and change the save location to the USB drive
3. Click the “Ok” Button
You're done! Please attach the compressed file to your email or case with us so that we can assist further. If the file size exceeds 20MB, please use a file transfer service of your choice and attach the link to your email or case.

If you have received the following message after launching Titan, you will need to close the application using the port which Titan requires.
To close the application listed in the 'Network Ports' dialogue box, you will need to open Task Manager, locate the application or service and stop this. When you have stopped this, click 'OK' to retry.
If OneApp.IGCC.WinService, appears in the dialogue box, follow the instructions listed below:
Intel has issued a driver update for their built in graphics cards that may cause issues with Titan starting up.
If you try and launch a PC suite application ( Simulator, TitanOne, TitanGo, and Mobile) and it does not complete start up and stays on the “pulsing grey Titan screen”. Also check in the Task Manager for windows if you see the “oneapp.igcc.winservice”, and or “Intel® Graphics Command Center Service” You will need to perform the following fix to
allow Titan to run again.
This driver update may come thru a windows update or by installing the Intel drivers manually. The drivers lock up ports required by Titan to run correctly.
After confirming in the Task Manger of Windows (control- alt - delete on keyboard then select task manager from the pop up list) that the “oneapp.igcc.winservice”, and or “Intel® Graphics Command Center Service” are running do the following:
- In Task Manger click the Services
- At the bottom click the “Open Services
- In the “Services” window that opens find “Intel (R) Graphics Command Center Service”
- Double click on it
- In the Window that opens, change the “Startup type” from “Automatic” to “Disabled”
- Click Apply
- Close the “Intel(R) Graphics Command Center Service Properties” and the “Services” windows
- Restart the computer.
Titan should now launch and run correctly.
Thru our testing disabling this service does not seem to have adverse effects. If you have graphical errors outside of Titan, you may wish to do the same steps but change from “ Disabled” to “Automatic” and restart the computer again , then perform
the fix again next time you need Titan.
A video of this has also been created here:
https://youtu.be/wfJUFc2rCCE
Alternative steps provided by Intel (Not Recommended):
Uninstall all the drivers, as they are only generic and might not be compatible with the laptop.
Our Intel drivers are only generic, we provide our drivers to the laptop manufacturers and they modify them in order to work with their laptops.
The laptop manufacturers integrated the graphic processor and soldered it down to their motherboard, the laptop manufacturer assures the compatibility and the drivers.
We strongly suggest to install only the drivers from the laptop manufacturer
installing incompatible drivers can create some registry issues. the following troubleshooting steps should be applied:
Check that the OS isupdate to the latest version
1. Download the latest graphic driver from the laptop manufacturer website for that specific model of laptop and save it on the computer.
2. Disconnect from the Internet so no new drivers are automatically installed by Windows Update.
3. Uninstall the graphic driver and all the other legacy drivers from Control Panel > Programs and Features.
4. Restart the computer.
5. Confirm in Device Manager > Video Adapters the controller is listed as 'Microsoft Basic Display Adapter' > if not, repeat steps 2 through 4.
6. If the adapter continues to be listed as ‘Intel HD Graphics’ or similar, and no other Intel Graphics driver is listed under 'Programs and Features' for removal, then it means Windows has switched to a previously installed Legacy driver. At this
point we can remove Legacy drivers from Device Manager:
6.1.1 Right-click on 'Intel HD Graphics' or similar, and select 'Uninstall Device'
6.1.2 In the pop-up window make sure 'Delete the driver software for this device' is checked.
6.1.3 Click on 'Uninstall'.
6.1.4 Restart. (Repeat steps 6.1.1 through 6.1.4 until the device gets listed as 'Microsoft Basic Display Adapter')
7. Install the graphic driver that was downloaded on step 1.
8. Restart the computer.
9. Reconnect to the Internet.
10. Download the Intel Graphics Command Centre from the Microsoft Store. ‘
Titan uses the following ports over the network. If your network includes firewalls you might need to know these so you can set up rules for them.
| Protocol |
Port |
Address |
Notes |
| |
|
|
|
| TitanNet |
TCP 808
|
All available adapters
|
Titan Remote, TNPs, multi-user and backup |
| |
|
|
|
| HTTP |
TCP 4430 |
All available adapters
|
Web API |
| |
|
|
|
| SLP |
UDP 427 |
Multicast 239.255.255.253 |
Used to discover TitanNet devices on the network |
| |
|
|
|
| Ping |
ICMP echo |
Any adapters that are in use |
Monitors connection to TitanNet devices |
| |
|
|
|
| Art-Net |
UDP 6454 |
By default all wired adapters |
|
| |
|
|
|
| sACN |
UDP 5568 |
Multicast 239.255.0.0-239.255.249.255 |
|
| |
|
|
|
| CITP |
UDP 4809/TCP |
Multicast 224.0.0.180 |
Used for communication with Capture Visualiser and media servers. Discovery done by multicast UDP then negotiates TCP connection |
| |
|
|
|
| RDMNet |
UDP 5569 |
|
|
| |
|
|
|
| ProDJ Tap |
UDP 60000-60002, 65023-65535
|
|
Protocol for getting data from Pioneer DJ equipment by software now known as TC-Supply |
| |
|
|
|
| LiveDMX |
UDP 5584 |
Multicast 239.184.0.0-239.184.249.255 |
Used for internal Visualiser DMX data |
| |
|
|
|
| NTP |
UDP 1234 |
Between TitanNet hosts |
Non-standard NTP port |
| |
|
|
|
| NDI |
UDP 5353
|
Multicast between NDI sources and Panel |
mDNS for NDI source discovery |
| |
|
|
|
| NDI |
UDP 49152-65535 |
Between NDI sources and the Panel |
NDI video streams |